Haptic Setup EN FR

Haptic Documentation
v.2024.08.09

Haptic Documentation
4.1 – Native integration in games 8
4.2 – Backward Compatibility with SteamVR 9
5 – Steam Companion Application (for Windows) 9
6 – Wi-fi updater Error! Bookmark not defined.
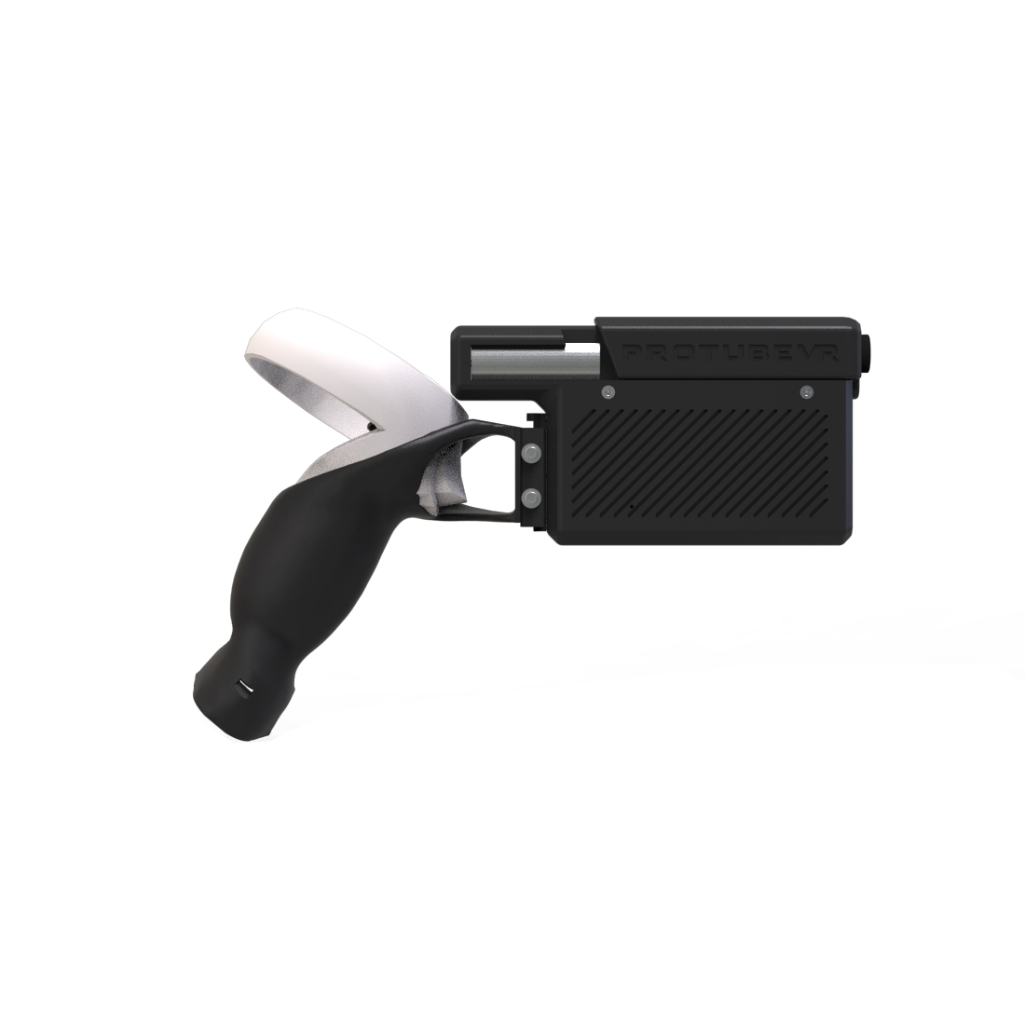
The ForceTube and the ProVolver use the same Haptic technology, so all the following instructions are similar for both. If there are any differences, we will let you know.
As the ForceTube is the original product, all the haptic devices are called “ForceTube” on the Bluetooth pairing and on the Companion app.
 Be sure to know what model you have before doing any software update. The device will not work if you do it wrong. This will not be taken under warranty.


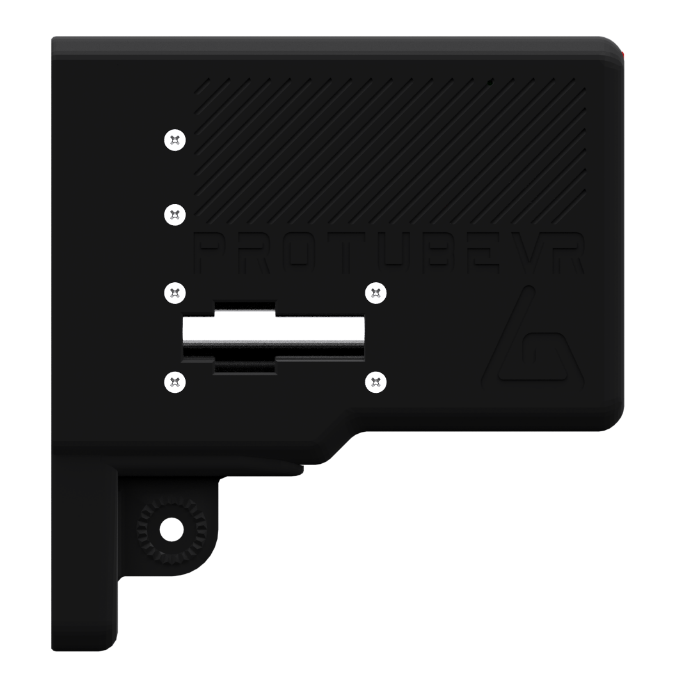
Charging slot
ForceTube
Explorer
ForceTube
Storm
Charging slot
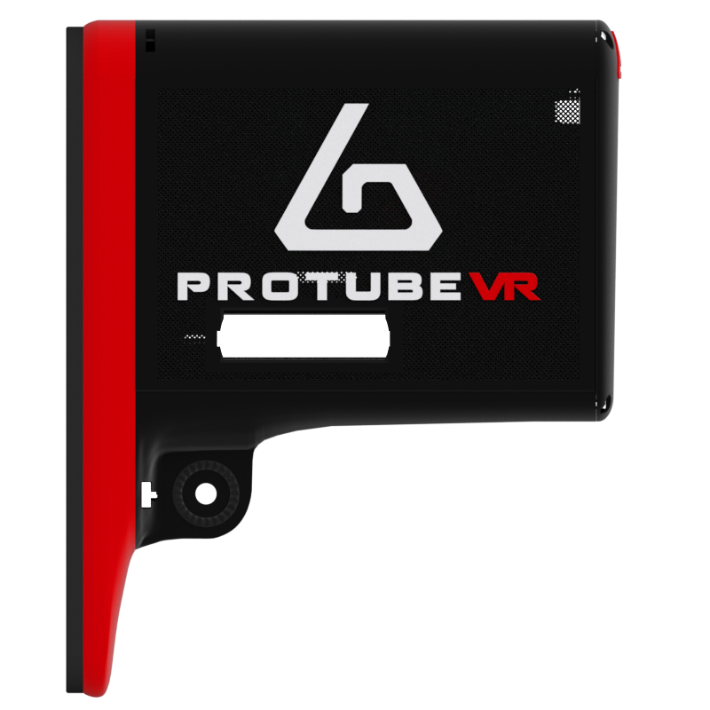
Charging slot
ProVolver
Explorer
ForceTube
Gen2
Charging slot
There are 2 LEDs inside the haptic device:
- The first little one is always red and means the module’s microcontroller is on.
- The second one is the battery level LED, it changes accordingly:
- 80 to 100%: White.
- 30 to 80%: Green.
- <30%: Red.
- It blinks red very quickly (3 Hz) if you have a battery cell with a too low charge level to work. In this state, the module will not work and needs to be charged.
The second LED blinks (near 1 Hz) when the Haptic device is not connected to an application (not to be confused with not paired to PC/Quest/phone) and is steady when connected.
After unboxing, the first thing you will need to do is charge your device. It arrives on low charge and takes about 7-8 hours to full charge*. You will know it is charging by the yellow/orange LED when plugged in. To charge it, use the provided cable on a PC USB port, or 500mA USB charger. Again, if you do not see a yellow/orange LED when plugged in, it is not charging, and you will need to try a different power source.
Important: trying to use a USB-C-to-USB-C or an electrical outlet instead of your PC can result in the module not receiving any charge or damaging the battery cell. You should use it as instructed above for it to charge!
The battery level LED turns orange when the module is charging. After 6 to 8 hours of charging, your Haptic device will be fully charged. You can check it by unplugging it (restart it if it shuts down when unplugging) and check the battery level LED is white.
We also recommend that you charge your device every 5-6 months if it is not actively in use.
Basically, charge it only when the battery is low (battery level LED is red), avoiding the battery cell to be damaged.
*After full charge, unplug the module without too much delay. Overcharging is the best way to damage batteries and shorten their lifespan.
To use the Haptic device, you first need to power it on and pair it with Bluetooth on your OS (Android for Meta Quest and Windows for PC HMDs).
3.1 – On Windows
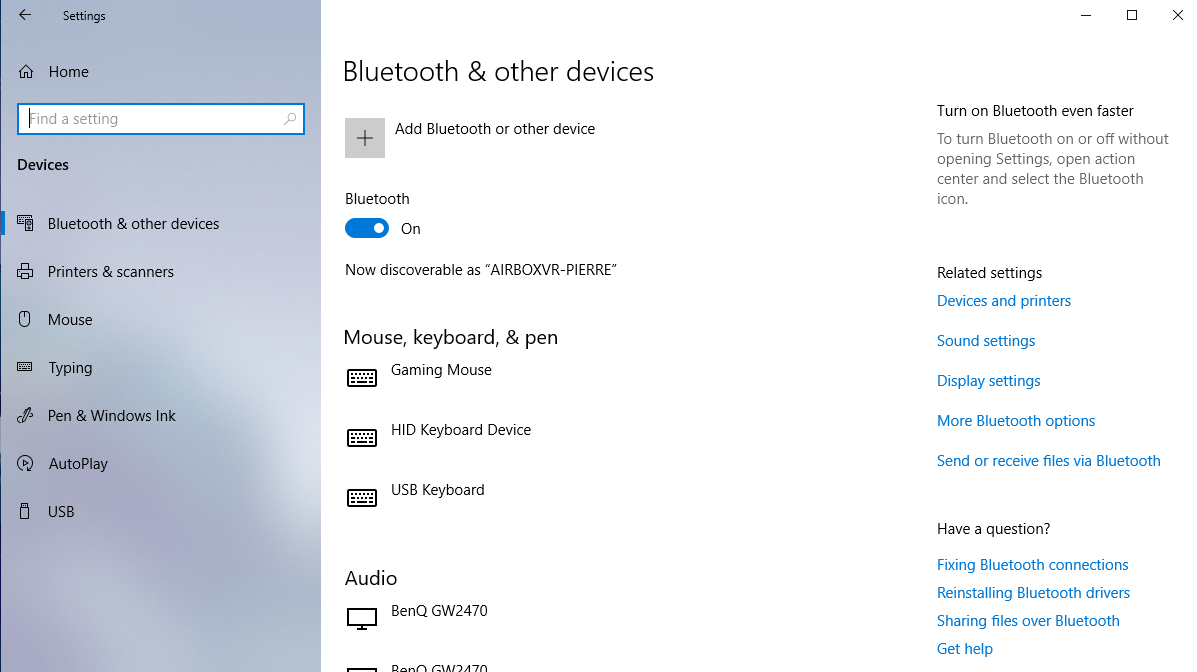
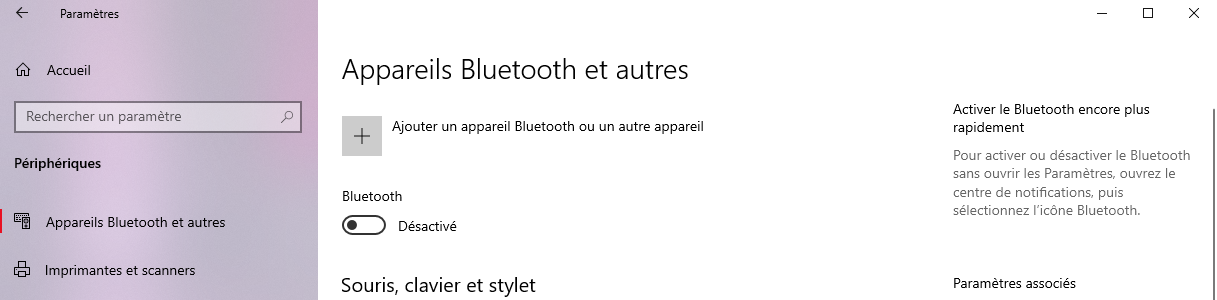
If your computer does not have Bluetooth, plug in the provided Bluetooth dongle, and enable Bluetooth. To pair it to Windows 10, power your module on and make sure it is not connected to another computer/phone/Meta Quest before (the batteries level LED should blink).
Windows 11 user, please check those settings first:
- In "Bluetooth & other devices > Devices" (Bluetooth & other devices>view more devices) change the option "Bluetooth devices discovery" to "Advanced".
- Click on the "More Bluetooth settings" and check the "Allow Bluetooth devices to find this PC" box.
Windows 10 user, you can skip to those following steps directely:
- Open the Windows settings.
- Click "Devices".
- Click "Bluetooth and other devices".
- Turn on Bluetooth if it isn't done.
- Click "Add Bluetooth or other device".
- Click "Bluetooth".
4
5
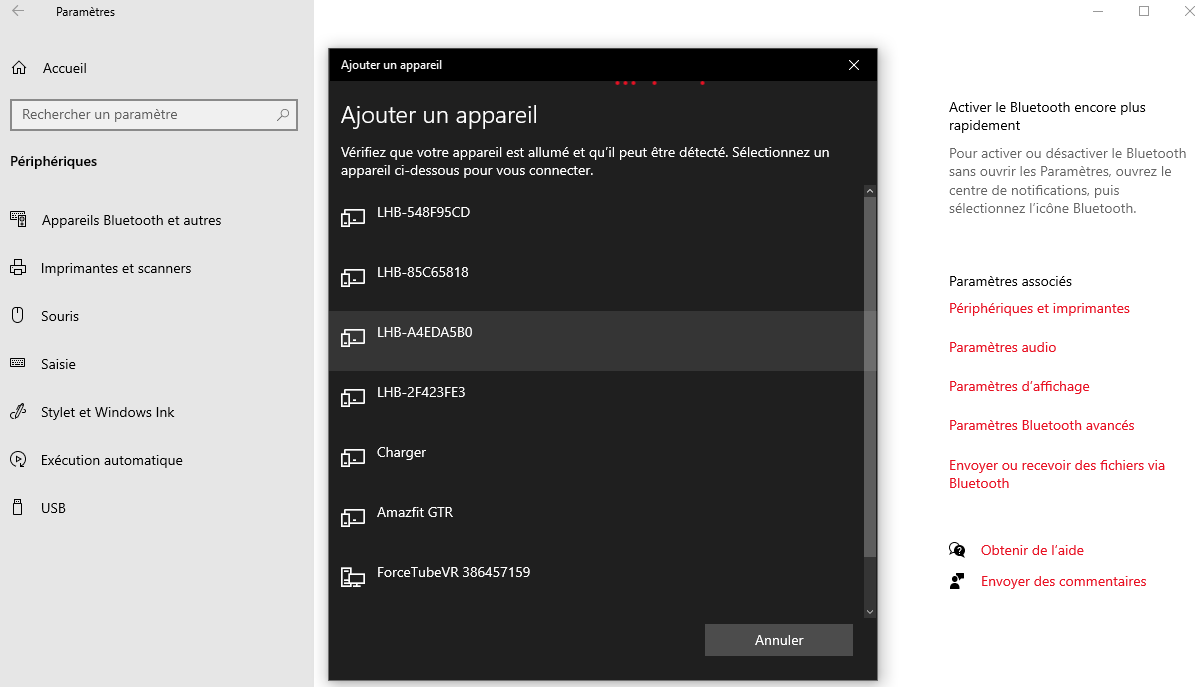
- (as mentioned above, all the haptic devices are called “ForceTube” on the Bluetooth pairing and on the Companion app.)
Your module should appear with numbers aside. It’s your module’s ID.

- Click on your ForceTube.
- Wait a few seconds while your module is pairing to Windows.
|
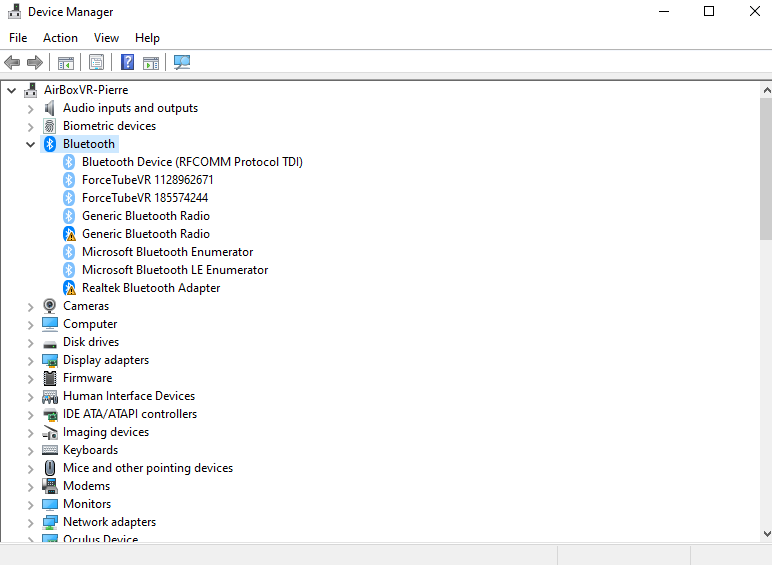
If your Haptic device is paired on Windows but cannot connect in games or the Companion Application, it may be due to a pairing to the bad Bluetooth transmitter (mainly Windows problem). Windows OS usually works with one Bluetooth transmitter, but all devices ever paired to one transmitter cannot be paired to another from the same computer. This problem can occur if you have different Bluetooth transmitters installed or even if you moved your Bluetooth dongle to a new USB port and Windows had difficulties recognizing it, assuming it is a new Bluetooth dongle even if it isn't. So, you should try to remove the ForceTube from your Bluetooth devices to pair it again. If you have difficulties to remove it:
If you accidentally remove a device, you should not, try to unplug it, restart your computer, and plug it again.
If you have the bug just described, uninstall all lighter icons devices from the Bluetooth tab. |

|
Additional Connection Troubleshooting: If after the troubleshooting steps you still cannot get the haptic device to connect to the companion app or games, or perhaps to be seen by Bluetooth to pair, here are some more steps to try:
|
3.2 – On Meta Quest
To pair a haptic device on Meta Quest:
- Power on the module and the Meta Quest.
- In the Meta Quest home, open the "Quick Settings".
- Click on "Settings" in the top right corner.
- Click on "Devices".
- Next, in the "Bluetooth" tab, click on "Pair".
- Slide down the list of devices and when you find your module’s serial number, click on it.
- After a few seconds, click on "Pair".
- Your module is now paired to your Meta Quest / Quest 2.
- The module will only “connect” once a compatible game is launched (refer to part 4.1 below).
4.1 – Native integration in games
Some games integrate the haptic device to be natively compatible.
List of compatible games (Reddit post)
You can refer to this Reddit post to see the list of all natively compatible games.
This list show which games can be played with our haptic devices without needed an external app.
It also explain which game has which feature (rifle, handgun, both-handed handguns or multi device supports).
It also tells on which platform the compatibility is supported (represented by a link to the related platform’s store).
You are invited to read everything from this post, as every information is crucial.
For PC VR users (Steam), some games have mods that allow native compatibility.
Some manipulation is required, so please refer the list of native mods (Reddit post).
These natively compatible games only need you to keep a paired module when you launch them, and it will automatically connect.
You can adjust the power and duration of haptic feedback using the Companion Application.
For more details, go to section 5.
|
Troubleshooting: If you cannot get a game to connect, you might have to update the library file, with a .dll extension. It is located in our Companion Application install folder. You can download it with the following link: Download the Companion App’s Git Hub If you can’t download the .rar file from the previous link:
To update the .dll:
If it still doesn’t connect, contact our Support on our website. |
4.2 – Backward compatibility with SteamVR
Other (non-natively compatible) games will work with the haptic devices if you launch them via SteamVR and use the Companion Application.
For more details, go to section 5.
4.3 – Playing with an Oculus/Meta Quest Headset
When playing with Meta Quest headset using the Quest link/Air link/Virtual Desktop, if the Steam game has an OculusVR Mode, Steam may start it by default, so you need to make sure Steam uses SteamVR:
- Find the game’s .exe file.
- Right click -> Properties -> Compatibility.
- Check “run compatibility mode” option and select windows 7.
- Check “run this program as administrator”.
- Apply the changes.
- Go to your steam library.
- Right Click -> Properties -> General.
- Write “-openvr” in the launch options.
Be sure to launch your games from SteamVR, especially if using Virtual Desktop (do not launch games directly from it).
5 – Steam Companion Application (for Windows)
The companion application allows our haptic devices to work with any games launched through SteamVR to have haptic feedback. Even those that are not natively compatible.
For more information, and how to use it, please refer to the Companion Application documentation.
You can download the Companion Application (Steam) here.
Have fun!

Documentation Haptique
1 – Les differents périphériques Haptiques 11
4.1 – Integration Native en Jeu 16
4.2 – Retrocompatibilité pour SteamVR 17
5 – Application compagnon Steam (pour Windows) 17
6 – Mise à jour par Wi-Fi Error! Bookmark not defined.
Le ForceTube et le ProVolver utilisent la même technologie haptique, les instructions suivantes s’appliquent donc aux deux produits.
Comme le ForceTube est le produit original, tous les modules haptiques sont appelés "ForceTube" lors du couplage Bluetooth et dans l'application Compagnon.
1 – Les differents périphériques Haptiques
 Assure-toi de savoir quel périphérique haptique tu possèdes avant de faire une mise à jour du logiciel. L’appareil ne fonctionnera plus si tu le fais pour le mauvais périphérique. Cela ne sera pas pris sous la garantie.


ForceTube
Explorer
ForceTube
Storm
Bouton de marche-arrêt
Port de charge
Port de charge
Bouton de marche-arrêt
Bouton de marche-arrêt


ProVolver
Explorer
ForceTube
Gen2
Port de charge
Port de charge / Bouton de marche-arrêt
Il y a 2 LED dans le module haptique :
- La première, petite, est toujours rouge et signifie que le microcontrôleur du module est allumé.
- La seconde est la LED du niveau de batterie et change de la façon suivante :
- 100 à 80% : Blanche.
- 80 à 30% : Verte.
- <30% : Rouge.
- Elle clignote très rapidement (3 fois par seconde) si l’une des batteries à un niveau de charge trop bas pour alimenter le module haptique. Dans cet état, le module haptique ne fonctionnera pas et aura besoin d’être chargé.
La seconde LED clignote plus lentement (1 fois par seconde) lorsque le périphérique haptique n’est pas connecté à une application (à ne pas confondre avec lorsque qu’il n’est pas appairé à un PC/Quest/téléphone) et est stable une fois connecté.
A l’ouverture de la boite, la première chose à faire est de charger l’appareil. Il arrive avec une charge faible et il lui faut environ 7 à 8 heures pour le charger complètement*. Tu sauras qu'il est en train de charger grâce au voyant jaune/orange lorsqu'il est branché. Pour le charger, utilise le câble fourni sur le port USB d'un PC ou sur un chargeur USB de 500 mA. Encore une fois, si tu ne vois pas de LED jaune/orange lorsqu’il est branché, c'est qu'il n'est pas en train de charger et tu devras essayer une autre source d'alimentation.
Important : Tenter d’utiliser un câble USB-C à USB-C ou un adaptateur à prise mural à la place d’un PC peut résulter à la non-charge du module. Tu devrais l’utiliser comme instruit au-dessus pour que la charge fonctionne correctement !
La LED du niveau de batterie devient orange quand le module haptique est en charge. Après 6 à 8 heures de charge, ton module sera complètement chargé. Tu peux le vérifier en le débranchant (redémarre-le s’il s’éteint lors du débranchement) et vérifie si la lumière de la LED est blanche.
Nous recommandons également de recharger l’appareil tous les 5 à 6 mois s'il n'est pas utilisé activement.
En gros, ne le charge que lorsque la batterie est faible (le voyant de niveau de la batterie est rouge), afin d'éviter d'endommager la batterie.
*Une fois le modulé chargé à 100%, il est préférable de le débrancher sans trop de délai. La surcharge est le meilleur moyen d'endommager les batteries et de raccourcir leur durée de vie.
Pour utiliser le module haptique, tu auras premièrement besoin de l’allumer et de l’appairer à un système d’exploitation (Android pour Meta Quest et Windows pour PC) grâce au Bluetooth.
3.1 – Sur Windows
Si ton ordinateur n’a pas de Bluetooth, branche la clef Bluetooth fournie. Pour appairer sur Windows 10, allume ton module et assure-toi, avant tout, qu’il ne soit pas déjà connecté à un autre appareil (PC/téléphone/Meta Quest). La LED de batterie devrait clignoter.
Utilisateur sous Windows 11, merci de vérifier ses paramètres avant tout :
- Dans "Bluetooth et appareils > appareils" (Bluetooth et autres appareils>afficher d’autres périphériques) change l’option "Découverte des appareils Bluetooth" en "Avancé".
- Clique sur "Plus de paramètres Bluetooth" Et coche la case "Autoriser les périphériques Bluetooth à détecter de PC".
Utilisateur Windows 10, tu peux passer directement aux étapes suivantes :
- Ouvre les paramètres Windows.
- Clique sur "Périphérique".
- Clique sur "Appareils Bluetooth et autres".
- Allume le Bluetooth si cela n’est pas déjà fait.
- Clique sure “Ajouter un appareil Bluetooth ou un autre appareil".
- Clique sur "Bluetooth".
5
4
- (Comme mentionné ci-dessus, tous les modules haptiques sont appelés "ForceTube" sur le jumelage Bluetooth et sur l'application Compagnon).
Ton module haptique devrait apparaitre avec un numéro à côté (c’est la référence de ton module haptique).
7
- Clique sur ton module haptique.
- Attends quelques secondes le temps que ton module haptique se paire à Windows.
|
Dépannage : Si ton Module haptique est appairé à Windows mais n’arrive pas à se connecter en jeu ou dans l’application compagnon, cela peut être dû à un appairage du transmetteur Bluetooth du Module haptique se pairant au mauvais transmetteur Bluetooth de l’appareil (principalement un problème Windows). Le système d’exploitation Windows fonctionne en général avec un seul transmetteur Bluetooth, mais tout appareil appairé à un transmetteur et ne peut pas s’appairer à un autre transmetteur du même ordinateur. Ce problème peut arriver si tu as plusieurs transmetteurs Bluetooth ou si tu déplaces la clé Bluetooth sur un autre port USB. Windows peut rencontrer des difficultés, pensant que c’est une nouvelle clé Bluetooth même si ce n’est pas le cas. Dans ce cas, tu devrais enlever le module haptique de tes appareils appairés en Bluetooth et le réappairer. Si tu ne sais pas comment faire, voici comment :
Si tu as désinstallé un appareil que tu n’aurais pas dû, débranche-le, redémarre ton ordinateur, et rebranche l’appareil.
Si tu as le bug qui vient d’être décrit, désinstalle tous les appareils avec une icône plus claire. |

|
Dépannage des problèmes de connexion supplémentaires : Si après le dépannage précédent tu n’arrives toujours pas à faire que le module haptique se connecte à l’application compagnon ou aux jeux, ou bien n’est pas vu par le Bluetooth afin d’être appairé, voici quelques autres étapes à essayer :
|
3.2 – Sur Meta Quest
Pour appairer le module haptique sur le Quest :
- Allume le module haptique et le Meta Quest.
- Dans le menu principal, clique sur "Paramètres rapides".
- Clique sur "Paramètres" dans le coin en haut à droite.
- Clique sur "Appareils".
- Puis dans la partie "Bluetooth", clique sur "Appairer".
- Fais défiler la liste des appareils et lorsque tu trouves le numéro de série de ton module haptique, clique dessus.
- Après un court instant, une fenêtre s’ouvre, il faut cliquer sur "associer".
- Ton module est maintenant appairer à ton casque Meta Quest.
- Le module ne se “connecte” que quand un jeu compatible est lancé (réfère toi à la partie 4.1 dessous).
4.1 – Intégration native en jeu
Certains jeux intègrent le module haptique afin qu’il soit nativement compatible.
Liste de jeux compatibles (poste Reddit)
Tu peux te référer à ce poste Reddit pour voir la liste des jeux nativement compatibles.
Celle liste montre quels jeux peuvent êtres utilisez avec nos périphériques haptiques sans avoir besoin d’application externe.
Elle explique aussi quel jeu à quelles fonctions (fusil à deux main, pistolet, double pistolets, multi périphérique…).
Ainsi que sur quelle plateforme la compatibilité est supportés (représenté par un lien vers la boutique de la plateforme en question).
Nous t’invitons à lire tout le poste, car chaque information est importante.
Pour les utilisateurs PC VR (Steam), certains jeux ont un mod qui permet de créer une compatibilité native.
Quelques manipulations sont nécessaire, tu peux donc te référer à la liste des mods natifs (poste Reddit).
Ces jeux nativement compatibles ont seulement besoin que le module haptique soit appairé au system d’exploitation lorsqu’ils sont lancés, et s’y connecteront automatiquement.
Tu peux ajuster la puissance et la longueur du retour de force du Module haptique en utilisant l’Application compagnon.
Pour plus de détails, va à la section 5.3.
|
Dépannage : Si la connexion entre le module et le jeu ne se fait pas, il faut peut-être mettre à jour le fichier de librairie avec l’extension .dll. Il se situe dans le fichier d’installation de l’application compagnon. Tu peux le télécharger sur le lien suivant : Télécharge l’Application Compagnon sur le Git Hub Si tu ne peux pas télécharger le fichier .rar depuis le lien précèdent :
Pour mettre à jour le fichier .dll :
Si tu n’arrives toujours pas à te connecter, contacte le Service de support sur notre site. |
4.2 – Rétrocompatibilité pour SteamVR
D’autres jeux peuvent fonctionner avec le module haptique à condition qu’ils soient lancés avec SteamVR et d’utiliser l’Application compagnon.
Pour plus de détail, va à la section 5.2
4.3 – Jouer avec un casque Meta
En utilisant un casque Meta avec Steam, si le jeu possède un mode OculusVR, Steam pourrait lancer le jeu avec ce mode par défaut. Pour utiliser l’application compagnon, il faut s’assurer que Steam utilise le mode SteamVR :
- Trouve l’exécutable du jeu (.exe).
- Clic droit -> Propriétés -> Compatibilité.
- Coche la case « Exécuter ce programme en mode compatibilité pour » et sélectionne Windows 7.
- Coche la case « Exécuter ce programme en tant qu’administrateur ».
- Retourne dans la librairie Steam.
- Clic droit sur le jeu -> Propriétés -> Général.
- Écris « -openvr » dans les options de lancement.
Sois sûr de lancer tes jeux depuis l’environnement SteamVR, surtout si tu utilises un Quest avec Virtual Desktop.
5 –Application compagnon Steam (pour Windows)
L’application compagnon permet à nos périphériques haptiques de fonctionner avec n’importe quel jeu lancé sur SteamVR d’avoir des réactions haptiques. Même si ce jeu n’est pas nativement compatible.
Pour plus d’information, et pour savoir comment l’utiliser, merci de te référer à la documentation de l’Application Compagnon.
Tu peux télécharger l’Application compagnon (Steam) ici.
Amuse-toi bien !
No Comments