
Haptic Setup EN Test
INTRODUCTION
________________________________________________________________________________________________________________________________________________
The ForceTube and the ProVolver use the same Haptic technology, so all the following instructions are similar for both. If there are any differences, we will let you know.
As the ForceTube is the original product, all the haptic devices are called “ForceTube” on the Bluetooth pairing and on the Companion app.
1 - HAPTIC DEVICES
________________________________________________________________________________________________________________________________________________
|
|
|
| ForceTube Explorer | ForceTube Storm |
|
|
|
| ForceTube Gen2 | ProVolver Explorer |
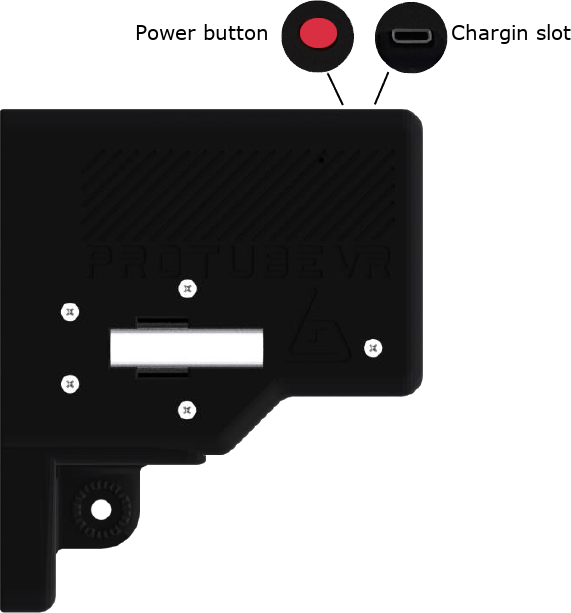
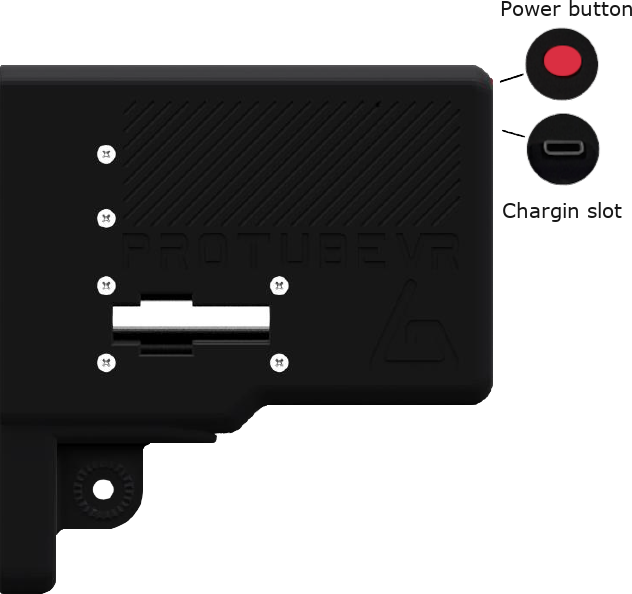
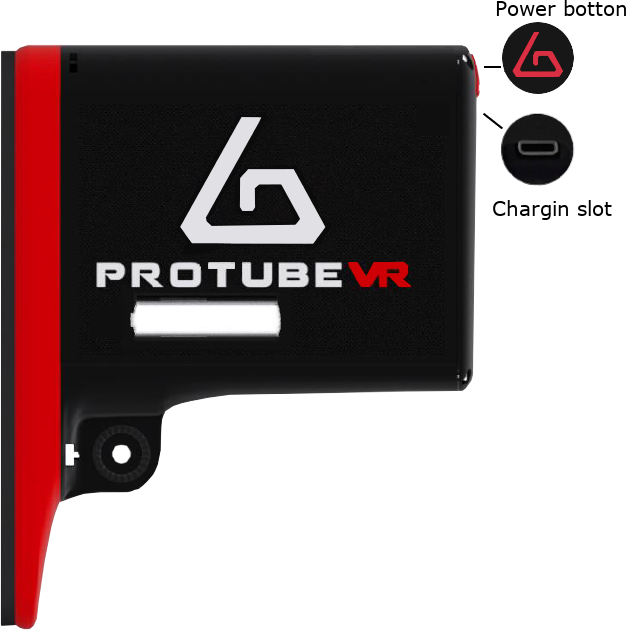
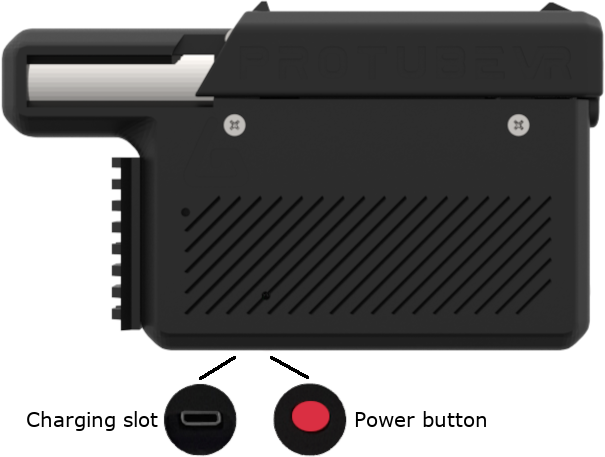
2 - BATTERY AND LED
________________________________________________________________________________________________________________________________________________
There are 2 LEDs inside the haptic device:
- The first little one is always red and means the module’s microcontroller is on.
- The second one is the battery level LED, it changes accordingly:
- White: 80 to 100%
- Green: 30 to 80%
- Red: <30%
- Orange: Haptic device is plugged and charging.
It blinks red very quickly (3 Hz) if you have a battery cell with a too low charge level to work. In this state, the module will not work and needs to be charged. - Blue: Haptic device overheat. The module will lock itself and won’t work for a while, until it has cooled down. Once the blue LED is off, you can use the module again.
The bigger LED blinks when the haptic device is not connected to an application (not to be confused with not paired) and is steady when connected.
After unboxing, the first thing you will need to do is charge your device. It arrives on low charge and takes about 6-8 hours to full charge*. You will know it is charging by the yellow/orange LED when plugged in. To charge it, use the provided cable on a PC USB port, or 500mA USB charger. Again, if you do not see a yellow/orange LED when plugged in, it is not charging, and you will need to try a different power source.
*After full charge, unplug the module without too much delay. Overcharging is the best way to damage batteries and shorten their lifespan.
Important: trying to use a USB-C-to-USB-C or an electrical outlet instead of your PC can result in the module not receiving any charge or damaging the battery cell. You should use it as instructed above for it to charge!
The battery level LED turns orange when the module is charging. After 6 to 8 hours of charging, your Haptic device will be fully charged. You can check it by unplugging it (restart it if it shuts down when unplugging) and check that the battery level LED is white.
We also recommend that you charge your device every 5-6 months if it is not actively in use.
Also, charge it only when the battery is low (battery level LED becomes red), avoiding the battery cell to be damaged.
Important notice: It is best to keep the battery level between 20 and 80% to assure a longer battery life.
So only green battery level.
Also, it is recommended to store the module with a battery over 80% when not used for over a month. Avoiding the battery to be damaged.
3 - BLUETOOTH PAIRING
________________________________________________________________________________________________________________________________________________
To use the Haptic device, you first need to power it on and pair it with Bluetooth on your OS (Android for Meta Quest and Windows for PC HMDs).
3.1 - On Windows
.........................................................................................................................................................................................................................
If your computer does not have Bluetooth 4, plug in the provided Bluetooth dongle, and enable Bluetooth.
(If you have BT5, you will need to disable it on the device manager first, then plug the provided dongle)
To pair it to Windows 10, power your module on and make sure it is not connected to another computer/phone/Meta Quest before (the batteries level LED should blink).
Windows 11 user, please check those settings first:
- In "Bluetooth & other devices > Devices" (Bluetooth & other devices>view more devices) change the option "Bluetooth devices discovery" to "Advanced".
- Click on the "More Bluetooth settings" and check the "Allow Bluetooth devices to find this PC" box.
Windows 10 user, you can skip to those following steps directly:
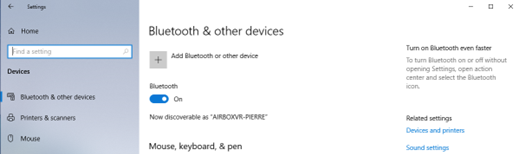
- Open the Windows settings.
- Click "Devices".
- Click "Bluetooth and other devices".
- Turn on Bluetooth if it isn't done.
- Click "Add Bluetooth or other device".
- Click "Bluetooth".
-
All the haptic devices are called “ForceTube” on the Bluetooth pairing and on the Companion app.
Your module should appear with numbers aside. It’s your module’s unique ID.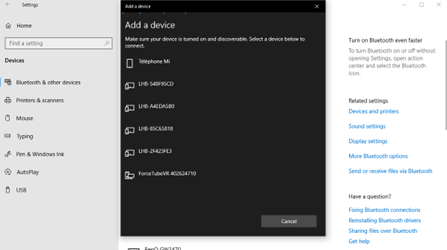
-
Click on your ForceTube.
-
Wait a few seconds while your module is pairing to Windows. It may ask to check a code, just skip and proceed.

Troubleshooting:
If your Haptic device is paired on Windows but cannot connect to games or the Companion Application, it may be due to a pairing with the bad Bluetooth transmitter (mainly Windows problem).
Windows OS can only allow one Bluetooth transmitter, but all devices ever paired to one transmitter cannot be paired to another from the same computer at the same time.
This problem can occur if you have different Bluetooth transmitters installed or even if you moved your Bluetooth dongle to a new USB port and Windows had difficulties recognizing it, assuming it is a new Bluetooth dongle even if it isn't.
So, you should try to remove the ForceTube from your Bluetooth devices to pair it again.If you have difficulties to remove it:
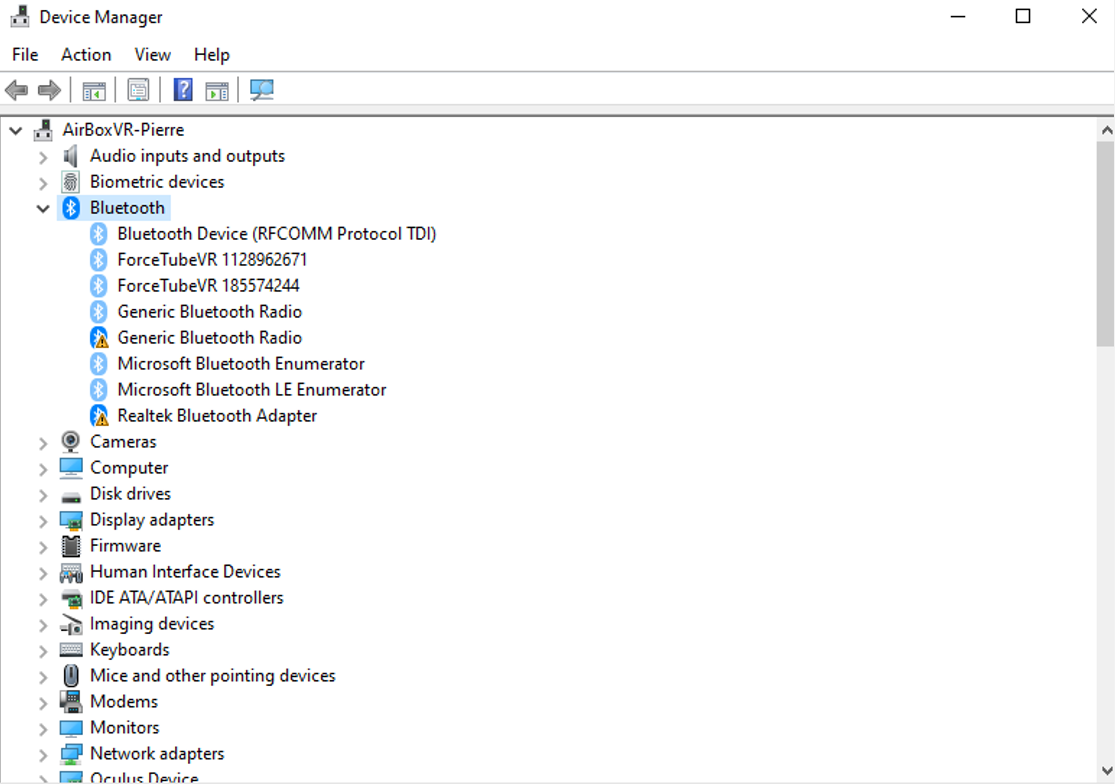
- Go to your Device Manager.
- Click on "View".
- Click on "Show Hidden Devices".
- Open the "Bluetooth" tab.
- In this "Bluetooth" tab, uninstall all unconnected devices (they have lighter icons) by right-clicking them and selecting "Uninstall device" and restart your computer.
- Once done, try to pair again your module on Windows.
If you accidentally remove a device, you should not, try to unplug it, restart your computer, and plug it again.
The picture shows 2 important things:
- There are two Bluetooth transmitters. Here, "Generic Bluetooth Radio", is the one provided with your product. The other one needs to be disabled.
- The elements in light blue (transparent) are paired devices but are not connected.
Additional Connection Troubleshooting:
If after the troubleshooting steps you still cannot get the haptic device to connect to the companion app or games, or perhaps to be seen by Bluetooth to pair, here are some more steps to try:
- If you have an Android phone:
- Download the APK on our GitHub.
- Install the ForceTube’s Android application APK on your phone.
- Try to pair the haptic device to your phone (like a normal Bluetooth device) with the application.
- If you see it and the module is pairing, then the problem is somewhere on your computer.
- If it still does not connect, contact our Customer service on our website.
- If the problem is on your computer, the first thing to check is the Bluetooth dongle.
- If you were using one you already had, try uninstalling it and using the provided one.
- If you were using the provided dongle, try uninstalling it, unplug it, restart your computer, and plug it on different USB ports (on the front of the PC is best).
- If after trying various USB ports it still does not work, then the issue is likely the Bluetooth dongle. Contact our Customer service on our website to have your Bluetooth dongle replaced.
- Alternatively, simply acquire another Bluetooth dongle to test. It must be 4.2 Bluetooth compatible or less.
3.2 - On Meta Quest
.........................................................................................................................................................................................................................
To pair a haptic device on Meta Quest:
- Power on the module and the Meta Quest. The haptic module’s battery LED should blink.
- On the Meta Quest, access the Bluetooth settings.
- Start the process of pairing a new device and look for the device named “ForceTubeVR #######”.
- Click on the device and wait until the “Pair” button shows, then click on it.
- Your module is now paired to your Meta Quest standalone HMD.
- At this point, the module’s LED will continue blinking, showing that it is not connected.
- The module will only “connect” and have a stable LED once a compatible game is launched (refer to part 4.1 below).
4 - PLAY
________________________________________________________________________________________________________________________________________________
4.1 - Native integration in games
.........................................................................................................................................................................................................................
Some games integrate the haptic device to be natively compatible.
List of compatible games (Reddit post)
You can refer to this Reddit post to see the list of all natively compatible games.
This list show which games can be played with our haptic devices without needed an external app.
It also explains which game has which feature (rifle, handgun, both-handed handguns or multi device supports).
It also tells on which platform the compatibility is supported (represented by a link to the related platform’s store).
You are invited to read everything from this post, as every information is crucial.
For PCVR users (Steam), some games have mods that allow native compatibility.
Some manipulation is required, so please refer to the list of native mods (Reddit post).
These natively compatible games only need you to keep a paired module when you launch them, and it will automatically connect.
You can adjust the power and duration of haptic feedback using the Companion Application, but this application is not mandatory for those games.
For more details, go to section 5.
4.2a - Backward compatibility with SteamVR
.........................................................................................................................................................................................................................
Other (non-natively compatible) games will work with the haptic devices if you launch them via SteamVR and use the Companion Application.
For more details, go to section 5.
4.2b - Playing with an Oculus/Meta Quest standalone Headset
.........................................................................................................................................................................................................................
When playing with Meta Quest headset using the Quest link/Air link/Virtual Desktop/Steam Link, if the Steam game has an OculusVR Mode, Steam may start it with this mode by default, so you need to make sure Steam uses SteamVR (OpenVR):
- Find the game’s .exe file.
- Right click -> Properties -> Compatibility.
- Check “run compatibility mode” option and select windows 7.
- Check “run this program as administrator”.
- Apply the changes.
- Go to your steam library.
- Right Click -> Properties -> General.
- Write “-openvr” in the launch options.
Be sure to launch your games from SteamVR, especially if using Virtual Desktop (do not launch games directly from it).
5 - STEAM COMPANION APPLICATION (FOR WINDOWS)
________________________________________________________________________________________________________________________________________________
The companion application allows our haptic devices to work with any games launched through SteamVR to have haptic feedback. Even those that are not natively compatible.
For more information, and how to use it, please refer to the Companion App documentation.
You can download the Companion App (Steam) here.
Have fun!