ProStraps Setup EN Test
The ProStraps allow you to secure your controllers and increase your comfort while playing.
 Securing your Controllers with ProStraps should take 10 minutes.
For video setup, you can check our YouTube Playlists.
Make sure you work in a clear area and be very careful. Some parts can easily be lost.
META QUEST 2
OPTION 1: PROSTRAPS WITHOUT MAGCUP
________________________________________________________________________________________________________________________________________________
 |
 |
 |
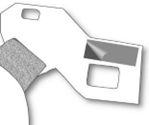
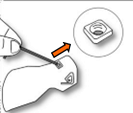
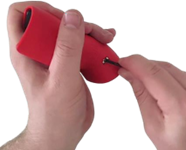
Remove the battery Cover from the controller.
Remove the plastic strip from the sticky pad, on the rubber part of the ProStraps.
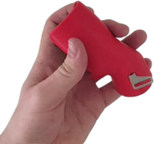
The sticky pad facing the Cover interior, insert the Cover’s notch inside the ProStrap’s hole.
Press the sticky pad for a couple of seconds to ensure adhesion between the ProStrap and the Cover.
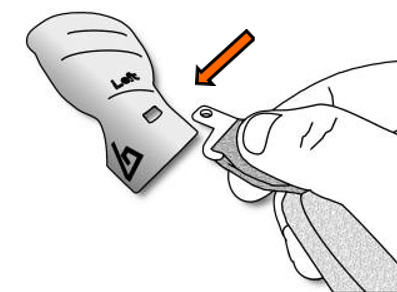
Take your controller with the battery uncovered.
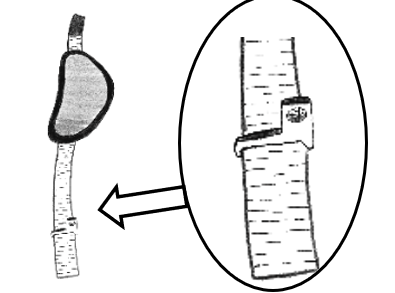
Remove the Meta Quest 2’s Wrist Strap and replace it with the ProStrap Ladderlock’s stub. Gently push it to the bottom.

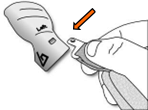
Put back the battery’s cover on the controller.
Insert the ProStrap’s strip inside the Ladderlock.
Now, you have your Quest 2 Controller with a ProStrap. (note to Tao: I can't copy the arrow image even if I want to)

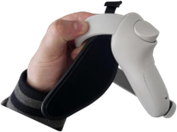
Tighten the strip around your hand and adjust the ProStrap around your hand.
Do it for the other one, and have fun.
OPTION 2: PROSTRAP WITH MAGCUP
________________________________________________________________________________________________________________________________________________
 |
|
|
|
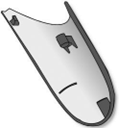
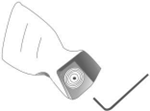
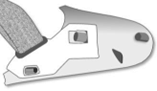
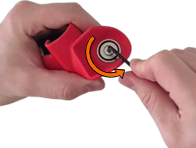
Unscrew the magnet inside the MagCup with the Allen key Put the Allen key in the magnet hole and push the MagCup’s M4 square nut, from inside to outside. You can do leverage with the Allen key to make the task easier.
|
When the square nut begins to go out, use the Allen Key from outside to remove it completely. The square nut is not useful anymore. But we recommend you to keep it, in case you had to remove the ProStrap.
|
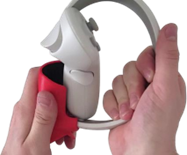
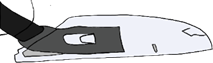
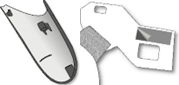
Insert the sling on the “L” nut (the part with the circle hole must be on the rounded side of the ProStrap). |
|
|
|
|
|
|
|
|
|
|
|
 |
|
Insert ProStrap’s metallic part inside the previously freed hole. Be sure to have the soft part of the ProStrap facing the MagCup and the Velcro part facing outward.
|
Screw back the magnet in its place with the Allen key.
|
Remove the battery Cover from the controller. Remove the plastic strip from the sticky pad, on the rubber part of the ProStraps. |
|
|
|
|
|
|
|
|
|
|
|
|
|
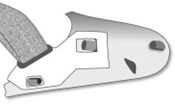
The sticky pad facing the Cover interior, insert the Cover’s notch inside the ProStrap’s hole. Press the sticky pad for a couple of seconds to ensure adhesion between the ProStrap and the Cover |
Put back the Prostrap-Upgraded Cover on its controller. |
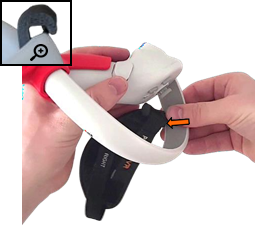
Insert the controller wrist strap inside the MagCup and bring it out through the hole provided for this purpose. |
|
|
|
|
|
|
|
|
|
|
|
|
|
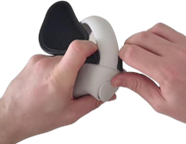
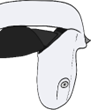
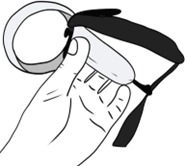
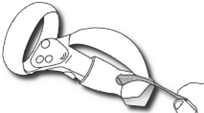
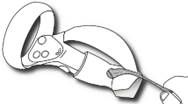
Insert the Controller into the MagCup. You can use the Wrist Strap to guide the controller inside the MagCup. Push until there is 2-3mm between the MagCup and the side button. |
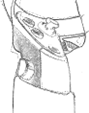
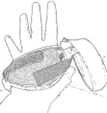
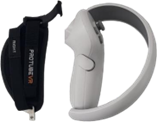
You can insert your hand between the MagCup and the ProStrap. Adjust the ProStrap according to your preferences. |
Do the same with the other ProStrap and controller.
Now, enjoy your game “hands-free”! |


OCULUS QUEST 1 / RIFT S
OPTION 1: PROSTRAPS WITHOUT MAGCUP
________________________________________________________________________________________________________________________________________________
 |
 |
 |
| Remove the battery Cover from the controller. | Remove the plastic strip from the sticky pad, on the rubber part of the ProStraps. |
The sticky pad facing the Cover interior, insert the Cover’s notch inside the ProStrap’s holes. Press the sticky pad for a couple of seconds to ensure adhesion between the ProStrap and the Cover. |
|
|
||
|
|
||
 |
 |
|
|
Take your controller with the battery uncovered. Remove the Oculus Quest 2’s Wrist Strap and replace it with the ProStrap Ladderlock’s stub. Gently push it to the bottom. |
Put back the battery’s Cover on the controller |
Insert the ProStrap’s strip inside the Ladderlock. Now, you have your Quest 1 / Rift S Controller with a ProStrap. |
|
|
|
|
|
|
|
|
|
|
||
|
Tighten the strip around your hand and adjust the ProStrap around your hand.
Do it for the other one, and have fun! |
|
|

OPTION 2: PROSTRAP WITH MAGCUP
________________________________________________________________________________________________________________________________________________
 |
|
 |
|
Unscrew the magnet inside the MagCup with the Allen key Put the Allen key in the magnet hole and push the MagCup’s M4 square nut, from inside to outside. You can do leverage with the Allen key to make the task easier. |
When the square nut begins to go out, use the Allen Key from outside to remove it completely. The square nut is not useful anymore. But we recommend you to keep it, in case you had to remove the ProStrap. |
Insert the sling on the “L” nut (the part with the circle hole must be on the rounded side of the ProStrap). |
|
|
||
|
|
|
|
|
|
|
 |
|
Insert ProStrap’s metallic part inside the previously freed hole. Be sure to have the soft part of the ProStrap facing the MagCup and the Velcro part facing outward. |
Screw back the magnet in its place with the Allen key. |
Remove the battery Cover from the controller. Remove the plastic strip from the sticky pad, on the rubber part of the ProStraps. |
|
|
|
|
|
|
|
|
|
|
 |
|
|
The sticky pad facing the Cover interior, insert the Cover’s notch inside the ProStrap’s holes. Press the sticky pad for a couple of seconds to ensure adhesion between the ProStrap and the Cover. |
Put back the ProStrap-Upgraded Cover on its controller. |
Insert the controller wrist strap inside the MagCup and bring it out through the hole provided for this purpose. |
|
|
||
|
|
|
|
|
|
 |
|
|
Insert the Controller into the MagCup. You can use the Wrist Strap to guide the controller inside the MagCup. Push until there is 2-3mm between the MagCup and the side button.
|
You can insert your hand between the MagCup and the ProStrap. Adjust the ProStrap according to your preferences.
|
Do the same with the other ProStrap and controller.
Now, enjoy your game “hands free”! |


PICO 4
OPTION 1: PROSTRAPS WITHOUT MAGCUP
________________________________________________________________________________________________________________________________________________
 |
  |
 |
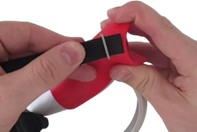
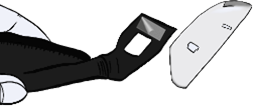
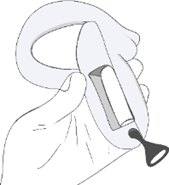
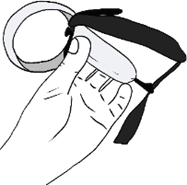
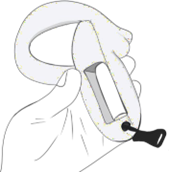
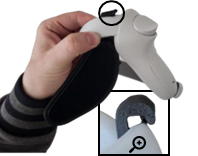
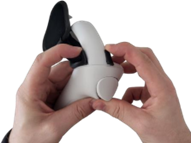
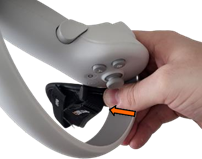
| We use the right-hand controller. The steps are the same for the left. | Place the top clip (plastic part) inside the controller’s ring. | While holding the clip in place, clip it by pushing it inward with your thumb. |
 |
 |
 |
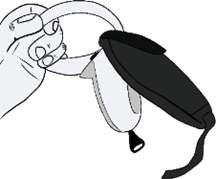
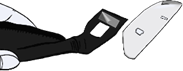
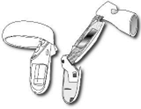
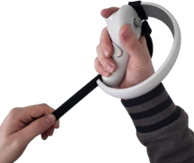
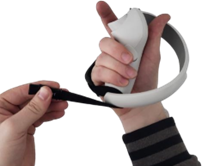
| Slide the clip against the controller. | Take the elastic sling. | Pass it around the ring. |
 |
 |
|
|
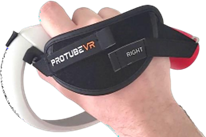
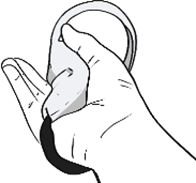
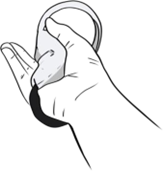
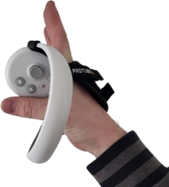
And scratch it back on the ProStrap. You will need to twist it at the very end, so it doesn’t bother you.
|
You’re done, you have
Do the same for the other one, and have |


OPTION 2: PROSTRAP WITH MAGCUP
________________________________________________________________________________________________________________________________________________
 |
 |
 |
|
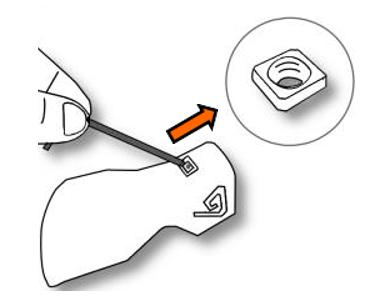
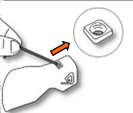
Unscrew the magnet inside the MagCup with the Allen key Put the Allen key in the magnet hole and push the MagCup’s M4 square nut, from inside to outside. You can do leverage with the Allen key to make the task easier.
|
When the square nut begins to go out, use the Allen Key from outside to remove it completely. The square nut is not useful anymore. But we recommend you to keep it, in case you have to remove the
|
Insert the “L” nut in the cup. The way matters: it needs to point toward the back of the cup. |
|
|
||
|
|
|
|
|
|
|
 |
|
Screw the magnet back.
|
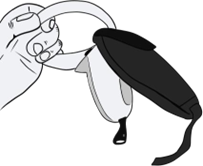
Insert the controller in the MagCup starting with the ring on the bottom and push inward.
|
While holding the top of the ProStrap lock (plastic part) in place, clip it by pushing it inward with your thumb. |
|
|
||
|
|
|
|
|
|
|
 |
|
Slide the lock against the controller.
|
Insert the elastic
|
And scratch it back on the ProStrap. |
|
|
|
|
|
|
|
|
|
|
||
|
|
You’re done, you have your ProStraps installed on your Pico 4 controller.
Do the same for the other one, and have |
|