
ProSaber Mounting EN Test

ProSaber
Hello, fellow gamer!
If you are reading this, you laid your hand on one of our ProSabers. With it, you will be able to play in Darth Maul mode in Beat Saber and similar games.
We invite you to join our Discord community for any question or directly contact us through our support service on our website.

Mounting your ProSaber should take 10 minutes.
First, make sure you work in a clear area and be very careful. Some parts can get lost easily.
Thank you for choosing the best Virtual Reality saber. But don’t take our word for it, try it. And most importantly, enjoy your games!
Parts list
________________________________________________________________________________________________________________________________________________
ProSaber Bag
....................................................................................................................................................................................................................................................................................


x2 x2 x1
Nut 20mm screw Hex Key 0,4cm
Rest of the box
....................................................................................................................................................................................................................................................................................


x2 x1 x2
Left & Right Fastened Cup Tube 300mm chrome or carbon Connection with internal notches
Mounting
________________________________________________________________________________________________________________________________________________
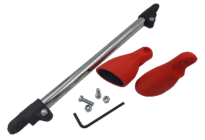
1 – First, make sure you have everything you need to mount your ProSaber.
________________________________________________________________________________________________________________________________________________
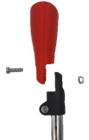
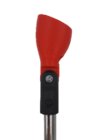
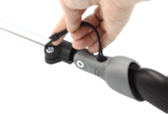
2a – The screw needs to go on the cup and the nut on the internal notched connection.
________________________________________________________________________________________________________________________________________________
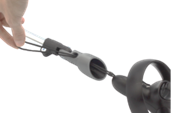
2b – If you are having trouble inserting the screw on the cup, you can use the Hex key to screw it in.
________________________________________________________________________________________________________________________________________________
2c – The nut needs to go on the internal notched connection.
________________________________________________________________________________________________________________________________________________
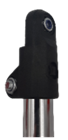
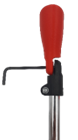
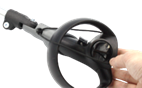
3 – Before tightening the screw, make sure it is aligned with the tube (example for Quest 2). It is preferable to put the controller in the cup to better realize this. (note to Tao: the yellow lines are multiple images on top, and therefore I cannot reproduce this as is.)
________________________________________________________________________________________________________________________________________________
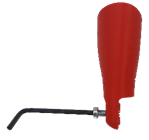
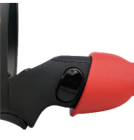
4 – Tighten the screw using the provided Hex key.
________________________________________________________________________________________________________________________________________________

5 – Make sure to tighten it strongly so the cup won’t move at all. (note to Tao: the red circle is another image, I cannot reproduce this as is)
________________________________________________________________________________________________________________________________________________
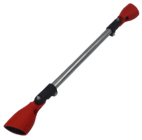
Do this with the other cup. You now have a fully functioning ProSaber!
________________________________________________________________________________________________________________________________________________
6 – Finally, insert the controllers in the cups, make sure to push them enough so they stay in. Enjoy this Darth Maul mod Saber.
________________________________________________________________________________________________________________________________________________
Controllers Security
________________________________________________________________________________________________________________________________________________
Pass the controller’s wrist strap into the cup’s hole
________________________________________________________________________________________________________________________________________________
Pass the controller into the wrist strap
________________________________________________________________________________________________________________________________________________
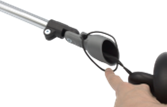
Pass the wrist strap under the cup
________________________________________________________________________________________________________________________________________________
Use the slider to tighten it on the ProSaber.
________________________________________________________________________________________________________________________________________________
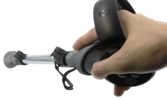
Push the controller into the cup. The more you push, the more it stays in the cup. Be careful not to push too much, it might damage the controller and/or the cups
________________________________________________________________________________________________________________________________________________