
Gunstock MagTube ForceTube Setup EN Test

MagTube & ForceTube Gun Stock Setup Instruction
Hello, fellow gamer!
If you are reading this, you laid your hands on one of our Gun Stocks.
MagTube Rifle, with Classic Stock.
Or
ForceTube Rifle, with Haptic Recoil Stock.
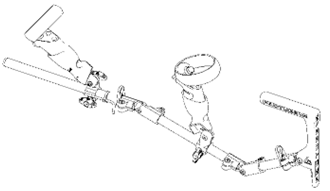
For both of them, you will use the same following steps to build your Gun Stock. The images represent a classic Stock, but this is the same for a ForceTube Haptic Stock.
We invite you to join our Discord community for any question or directly contact us through our support service on our website.

Mounting your MagTube / ForceTube Gun Stock should take 1h30m.
For video setup, you can check our YouTube Playlists.
First, make sure you work in a clear area and be very careful, some parts can get lost easily.
Thank you for choosing the best Virtual Reality stock rifle solution. But don’t take our words for it, try it. And most importantly, enjoy your games!
PARTS LIST
________________________________________________________________________________________________________________________________________________
Bag n°1
.....................................................................................................................................................................................................................................


x1 x1 x2 x1 x2 x1 x1
Ring Wedge Connection with internal notches 20mm screw O'ring Nut Notched Washer
Bag n°2
.....................................................................................................................................................................................................................................


x2 x1 x1 x1 x1 x1 x4 x2
Connection with external notches T-notched connection Hex screw Butterfly Hex washer 20mm screw O'ring Nut
Bag n°3
.....................................................................................................................................................................................................................................


x1 x1 x1 x1 x2 x2 x2 x2 x1 x2
Ring Wedge Connection with internal notches T-notched connection Hex screw Butterfly O'ring Nut Rubber washer Hex washer
Bag n°4
.....................................................................................................................................................................................................................................


x1 x1
Hex Key 0,4cm Hex Key 0,25cm
MagTube - Rest of the Box
.....................................................................................................................................................................................................................................


x1 x1 x1 x1 x2 x2 x1 x1
Tubes (chrome or carbon) 130mm. 200mm, 250mm 1 or 2 point sling L&R MagCups Magnetic Supports Classic Stock Optional Bipod
ForceTube - Rest of the Box
.....................................................................................................................................................................................................................................
x1 x1 x1 x1 x2 x2 x1 x1
Tubes (chrome or carbon) 130mm. 200mm, 250mm 1 or 2 point sling L&R MagCups Magnetic Supports Classic Stock Optional Bipod


x1 x1 x1
Haptic ForceTube Stock Bluetooth USB Dongle USB-C Charging cable
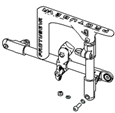
STEP 1: GUNSTOCK
________________________________________________________________________________________________________________________________________________
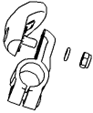
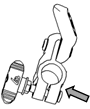
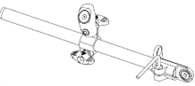
You will need: bag n°1, smallest tube and rifle stock.
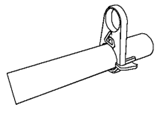
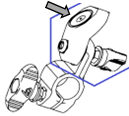
1.a – Put the wedge on the ring and put them both on the smallest tube.
(This step is not needed if you have a ForceTube)
1.b – Put the two connections with internal notches on each part of the small tube and screw them with the Hex key.

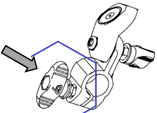
1.c – Apply some oil all around the notches on the connection which is the nearest from the ring.
1.d – Put one O’ring on the 20mm screw, slot them both into the hole provided in the stock.
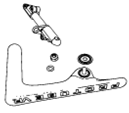
1.e – Then slide the notched washer (the notches have to be facing the same way) and the previously oiled connection over the screw.

1.f – Attach the screw securing the stock and the connection with one O’ring and the nut.
1.g – Screw all the pieces together taking care not to over tighten. You must be still able to rotate the stock by force.
.....................................................................................................................................................................................................................................
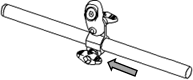
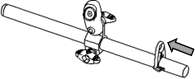
In the next steps, you will need the magnetic supports.
They are usually magnetically attached to the MagCups.
The magnets are quite strong when trying to detach them with hands, but do not be afraid of breaking them, they are made to resist this step.
You just need a little force to separate them. (note to Tao: I couldn't quickly find a way to get the gif in here)
STEP 2: REAR SIDE
________________________________________________________________________________________________________________________________________________
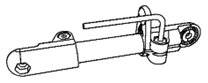
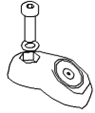
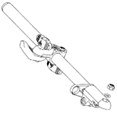
You will need: bag n°2, medium tube and notched magnetic bracket.
2.a – Apply some oil all around the notches on the T-notched connection.
(The mag support is usually attached to the MagCup)
2.b – Put one O’ring on the 20mm screw, slot them both into the hole provided in the notched magnetic bracket.
2.c – Then slide the previously oiled T-notched connection over the screw
2.d – Put one O’ring on the 20mm screw, slot them both into the hole provided in the stock.
2.e – Screw all the pieces together taking care not to over tighten. You must be still able to rotate the two parts by force.
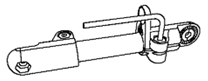
2.f – Unscrew the 18mm screw at the base of the T-notched connection. You will need it at the step 2.l).

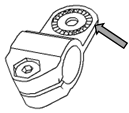
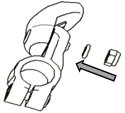
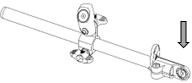
2.g – Set the butterfly screw on the hex washer. (note to Tao: the arrow is a separate image)
2.h – Screw the butterfly with the Hex screw to a nut on the other side
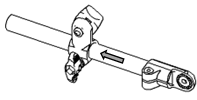
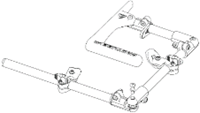
2.i – Slide the medium tube into the T-notched connection.
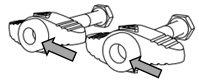
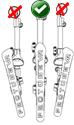
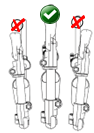
- If you aim with the right eye, the magnet must be facing right side.
- If you aim with the left eye, the magnet must be facing left side.
Then place the external notched connections on both side of the tube.
2.j – Finally screw the two external notched connections on the tube.
2.k – Apply some oil all around the external notches of the rear side.
2.l – Place one O’ring on the 18mm screw (the one from 2.f). Slide them both through the internal notched connection and the external connection.

2.m – Attach the screw securing both connection with one O’ring and the nut.
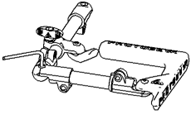
2.n – Screw all the pieces together taking care not to over tighten. You must be still able to rotate the two parts using force.
STEP 3: FRONT SIDE
________________________________________________________________________________________________________________________________________________
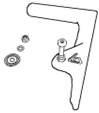
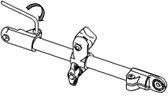
You will need: bag n°3M, longest tube and smooth magnetic bracket.
3.a – Apply a dot of oil on the base of the butterflies part and attach each butterfly with one Hex screw.
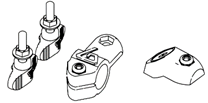
3.b – Remove the 18mm screw on the T-notched connection. You will need it at step 3.j.
Put the hex washers on the butterfly screws.
Put one nut on the T-notched connection and one on the smooth magnetic bracket.
(The mag support is usually attached to the MagCup (cf. intro of instruction))
3.c – Slot one butterfly screw into the hole provided on top of the T-notched connection.
Then slot into the rubber washer.
Then slot into the smooth magnetic bracket. Finally, secure with a nut.
3.d – Slide the other butterfly screw through the T-notched connection on the none-logo side.
Secure with the nut previously installed in 3.b.
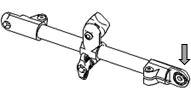
3.e – Put the previously assembled part through the longest tube.
- If you aim with the right eye, the magnet must be facing left side.
- If you aim with the left eye, the magnet must be facing right side.
3.f – Put the wedge on the ring and slide them through the stock of the tube.
3.g – Put the connection with internal notches on the tube and screw it with the Hex key.
3.h – Apply some oil around the internal notches.
3.i – Place one O’ring and the nut on the internal notched connector.
3.j – Place one O’ring on the 18mm screw previously removed from the T-notched connector (step 3.b).
Slide them both through the external notched connection and the internal connection.
Secure it with the nut on the other side.
3.k – Screw all the pieces together taking care to not over tighten. You must be still able to rotate the two parts by force.
STEP 4: ADJUSTMENTS
________________________________________________________________________________________________________________________________________________
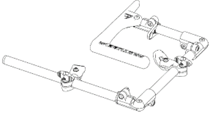
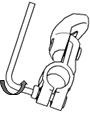
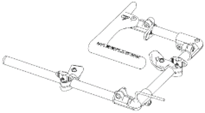
4.a – Bend all the connections at an angle of 90° so that the MagTube Rifle almost forms a square.
4.b – Adjust the medium tube with the top of the stock and tighten a bit more the screw from step 1.b.
4.c – Adjust the long tube with the rear of the butt and tighten a bit more the screw from step 2.j.

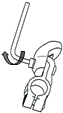
4.d – Slide the hex key through the clip, so you can clip it on your MagTube for later adjustments if needed.
STEP 5: FINAL TOUCH
You can magnetically attach the MagCups to the black magnetic holders.
Make sure the logo on the cups are facing the front of the Rifle.
Now, you can remove the wrist straps of your controllers and replace them with the ProTubeVR ones.
Congratulations!
Your MagTube rifle is now operational!
As a reminder, your MagTube will highly improve your freedom, your reaction time, and your efficiency after some training. It may take some time to get used to.