ProTas Joystick
All documentation pertaining to our ProTas Joystick including FAQ, Quick Start Guide, and Tutorials.
Frequently Asked Questions
Get to know the ProTas Joystick better through these frequently asked questions.
ProTas Joystick FAQ
· I already have a MagTube, do I need new cups? All ProTubeVR products using magnets use the same magnetic interfaces and are universally compatible. No matter what HMD you own, if you already have MagCups you want the ProTas Base product found here.
· Can I twist the ProTas (rotate the z axis)? Yes, the moving part is flexible, allowing it to rotate some distance safely, just don't go overboard.
· Can I use a second ProTas as a throttle? Yes, loosen the magnet retainer on the ProTas base to allow for forward and backward rotation. This allows use as a throttle.
· How do I mount in my setup to line up the ProTas with the joystick in game? ProTas works on many surfaces especially arm rests and sim rigs. Etsy has a lot of solid armrest hotas mounts that work well with ProTas. Desk mounts, speaker mounts, headset mounts; people have made use of all of these. You can attach it using Velcro straps or the reusable sticky pad found on the bottom. Refer to the Quick Start Guide for more information.
· What games does the ProTas work with? Refer to this reddit post and use it more of a mindset to have when looking at a potential game rather than a comprehensive list of every single compatible game in existence. This is also covered in the next page.
· The sticky pad won’t stay in place anymore, what do I do? The sticky pad is reusable. Simply rinse it down with water and let it dry and it will be good as new. We also offer replacement pads.
· The cup is difficult to detach from the ProTas how do I make it easier? There are a few ways to do this:
·
1. Loosen the magnet inside the cup or the bracket or both using the provided tiny allen key.
·
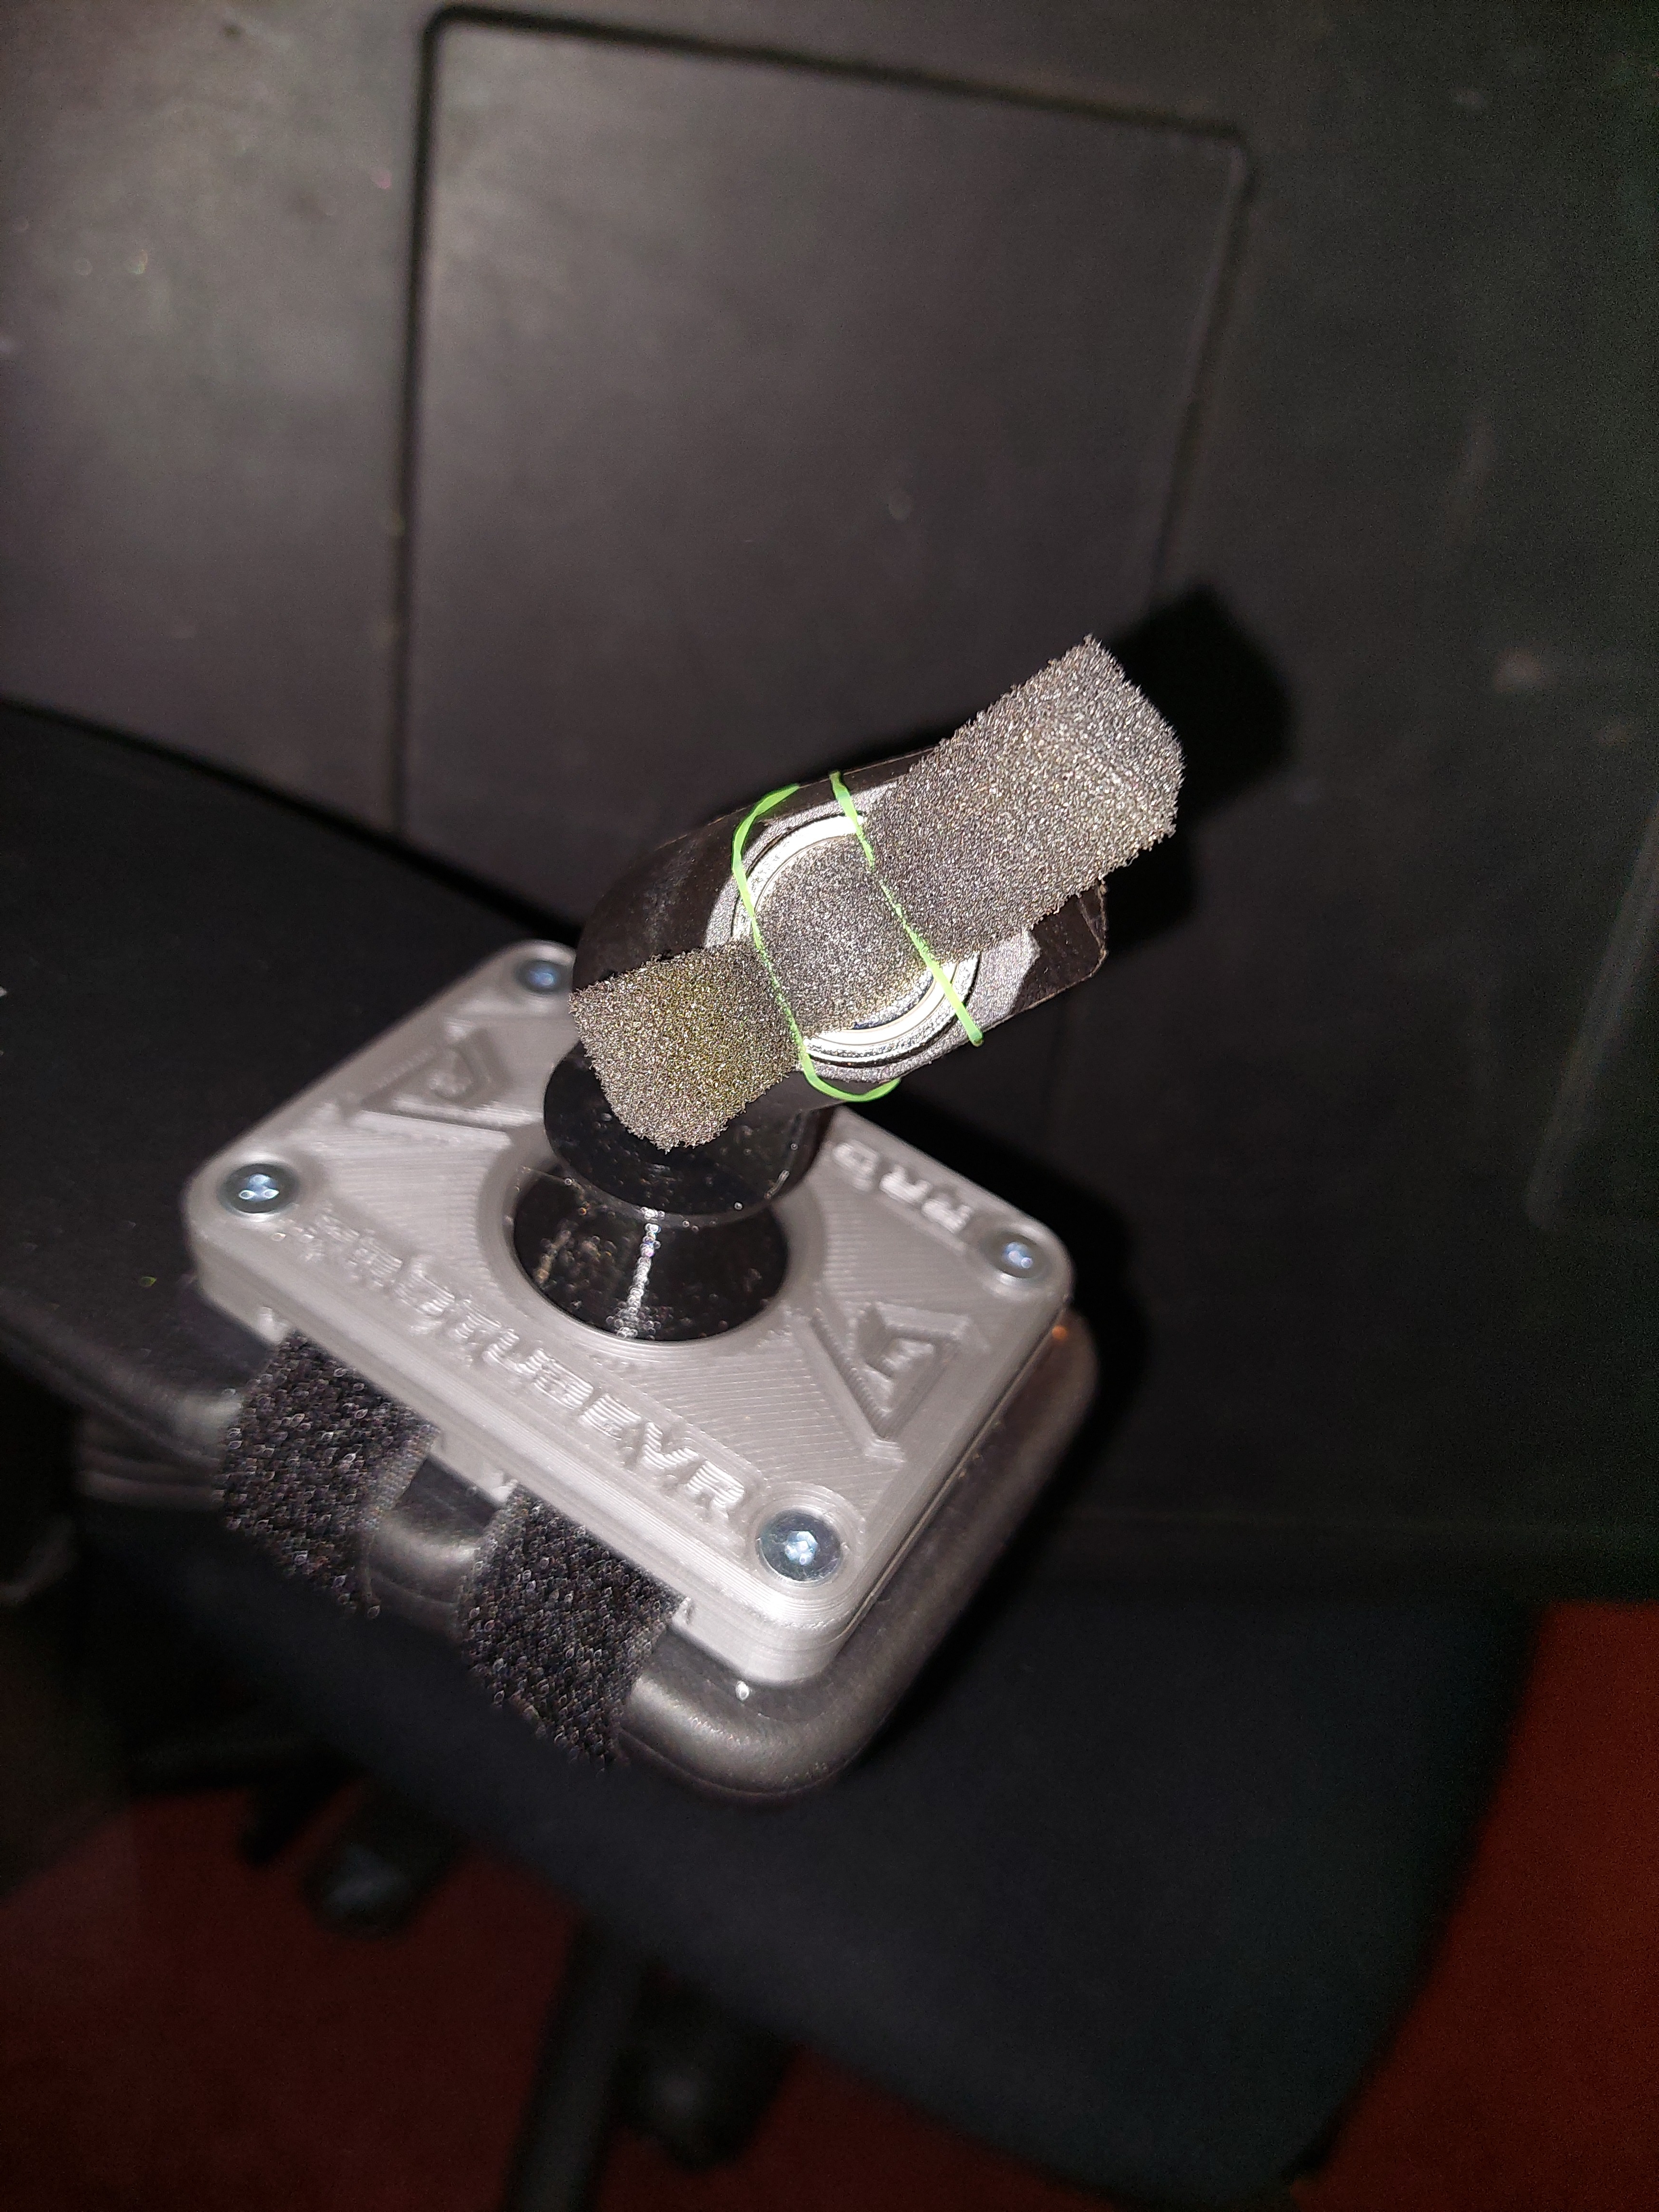
2. Apply something such as a piece of foam with a rubber band to weaken the connection.
·
3. Practice makes perfect. Because the bracket is attached to something that moves it requires a slightly different angle and amount of force to detach compared to the MagTube.
ProTas Joystick Compatible Titles
Below is a list of games that work with ProTas as confirmed by the community. Keep in mind any game can work with ProTas as long as these requirements are met:
-
The game lets you use your VR controllers
-
The game has you interact with cockpit controls using your VR controllers
With these requirements in mind, to easily find more games that are supported on Steam: browse games, and narrow by tag add VR & Flight, and under Narrow by VR Support select VR Supported (instead of VR only), and under Input select "Tracked Motion Controllers". Any game left visible in the search results should work! :smile: Keep in mind some games that work might not show up using these tags because not all support games are flying games (Vox Machinae for example). Have you played a game that isn't listed down below? Comment and it will be added to the list.
For simplicity, I'm only linking to the games' Steam pages. Some of these are available on other platforms (such as Ultrawings on Meta or PSVR). Disclaimer: this list is not comprehensive, and it is out of date. Use it more as a guideline for understanding what to look for in a game to know if it will work with the ProTas Joystick.
ProTas compatible titles:
- https://store.steampowered.com/app/1118070/1976__Back_to_midway/
- https://store.steampowered.com/app/837430/Flying_Aces__Navy_Pilot_Simulator/
- https://store.steampowered.com/app/862390/FlyInside_Flight_Simulator/
- https://store.steampowered.com/app/275850/No_Mans_Sky/
- https://store.steampowered.com/app/982700/Space_Battle_VR/
- https://store.steampowered.com/app/639130/Ultrawings/
- https://store.steampowered.com/app/334540/Vox_Machinae/
- https://store.steampowered.com/app/667970/VTOL_VR/
Quick Start Guide
Just got your ProTas Joystick? Read this to learn how to use it like a pro in no time. This basic guide is intended to provide first time owners with the immediate necessary information to go from unboxing to using in game.
Getting Started
Getting Started (with cups):
1. After unboxing, the first thing you need to do is get the mag cup or cups. They will be in their own bubble wrap bag, or already on the ProTas. If they are already on the ProTas, you can grab a cup firmly, and remove by using a doorknob twist motion, while your other hand firmly holds the ProTas against something (like a table top).
2. On each cup will be writing to indicate if it is for the left or right controller. Underneath, where you see the magnet, you might also see some more writing indicating which brand the cups are for (i.e. Quest 2). Please note: if you ordered ProStraps, they might already be pre-installed on the cups. I will cover those separately below.
3. Before putting your controllers into the cups, it is suggested to wipe down the part of the controllers that will go inside. This is to ensure optimal friction so they do not slide out easily. Next, observe the small hole in the cup. This is intended for feeding the wrist strap through, and should be facing you, or away from the trigger button on the controller. The magnet on the bottom of the left cup should be angled towards the right, and the magnet on the bottom of the right cup angled towards the left.
4. To install, simply start with the wrist strap and feed it through the small hole. Then push the controller into the cup until it cannot go any further. Use of excessive force is not required as it should easily go in until it hits friction, and then with a little bit of force you should be able to continue pushing in until it won't go any further. That is the point at which you should stop and it is considered installed in the cup. Please note: if you are using Index or PSVR 2, we have videos in Website tutorials under Cup.
Getting Started (with ProStraps):
1. All steps above apply. Before step 4, putting controllers into the cups, you will need to install the ProStraps as shown in our tutorials. Depending on your controller brand, and the state in which they were received (pre-installed vs separately) what you do may vary. But essentially, you need the bottom to be on the cup, and the top to either be connected to an insert you put inside your controller's battery cover (ProStraps Grips), or inside the cup itself (ProStraps GRips MK2 Flex for controller holder).
2. Once the ProStraps are correctly installed, you follow step 4 above.
Mounting your ProTas Joystick
Mounting your ProTas:
1. Before continuing, please consider reading our PDF Assembly guide (PROMPTS DOWNLOAD) for mounting to chair and desk. Following that, and having an understanding of your intended playspace, you can determine how you want to mount the ProTas. With all of this information in mind, before mounting continue to the next section of better understanding the ProTas, which is vital to quality use in game.
Understanding your ProTas:
1. The concept behind how the ProTas is used is very similar to that of the MagTube. You put the controllers on, and line things up in game. Where the ProTas drastically differs from the MagTube, is you are not carrying the virtual controls with you as you move around - they are in a very fixed position. You therefore need to adjust where the ProTas is physically to line up with your cockpit virtually. More importantly, just like how different guns in 1 game have different mounting points requiring adjustment of the MagTube for optimal alignment, the same can be said for different cockpits and different games.
2. Achieving a good alignment with the ProTas involves a multi-step process between physically adjusting the ProTas, and some adjustments in software (as in, the game, or tools your headset can use such as SteamVR, Oculus, etc.).
3. You can go about approaching good alignment in many different ways, but they all start by deciding where you will be mounting the ProTas. Keep in mind no matter where you mount it physically, you will not have a perfect universal alignment across all cockpits in all games. Like the MagTube, you will need to figure out good alignment multiple times if you play multiple games or use multiple cockpits. I will break down some basic steps you can take for each approach down below.
(First Time Use) Aligning your ProTas Joystick
Aligning your ProTas pt1 (for arm rest, or desk, or table, or anything else):
1. First you will mount your ProTas as shown in the PDF Assembly Guide to where you want it. For all steps of alignment, you will need to be where the ProTas is mounted, sitting or standing as you normally do.
2. Decide which game and cockpit you want to align.
3. Get in the cockpit in game. Observe where the cockpit instruments you need to interact with are located. Put your controller over the cockpit's flight stick and hold it like normal. Keeping your hand in place, remove your headset (or enable pass through if your headset has this feature) to observe where that is, in relation to where the ProTas is mounted.
4. Now that you have an idea of the offset between where the virtual controls are and where the ProTas rests you can go about reducing that offset as much as possible.
Aligning your ProTas pt2 (physical adjustment):
1. Keeping in mind the offset from step 4, take inventory of the physical adjustment available to you. Can you move the ProTas left or right? What about up or down? Forward or backward? What about you? Can you move in relation to where the ProTas is mounted? The closer you can move the ProTas physically to where the virtual controls are the easier you can achieve good alignment.
Aligning your ProTas pt3 (virtual adjustment all headsets):
1. Adjust your height in game. One simple but effective way to get the ProTas and virtual controls aligned is to recenter or reset your roomscale position. Specifically, you want to compensate for the offset between the virtual controls and the ProTas so that, when recentered or reset, if you go back to the ProTas, the controls are aligned. Obviously, this will change your perspective a bit, so you may be seeing out of the cockpit from a higher or lower virtual seating position. Please note that for this to work, you will need to do this when you are already in the game and already in the cockpit. This is for two reasons. First, this position you are adjusting it to is only temporary to right now. When you close the game, and run it again, you will have to do this all over again. Second, and most importantly, so that you can see the offset and adjust to it with less time in between adjustment and seeing the feedback of said adjustment.
Aligning your Protas pt4 (virtual adjustment PC VR):
1. Adjusting height & playspace position in SteamVR using OVR Advanced Settings. You will still need to do this while in the cockpit you wish to align, but makes doing so much easier.
Tutorials
All the tutorials traditionally found on our website, pertaining to the ProTas Joystick in alphabetical order
ProTas Setup EN
The ProTas allows you to increase your comfort while playing flying games or simulators and hold your controllers as if you were in a spaceship or airplane, or even a mecha.
 Installing your ProTas should take 3 minutes.
Make sure you work in a clear area and be very careful. Some parts can easily be lost.
Parts list
....................................................................................................................................................................................................................................................................................
| Tool bag | |||
 |
|
||
| x1 | x1 | ||
| 0,4cm Hex Key | 0,25cm Hex Key | ||
For ProTas pair (2 ProTas & 2 cups)
....................................................................................................................................................................................................................................................................................
| Rest of the box | |||||||
 |
 |
 |
 |
 |
 |
 |
 |
| x2 | x2 | x2 | x2 | x2 | x2 | x4 |
x2 |
| Base | Flex part | Magnetic support | 20mm screw | Nut | Pad | Scratch Strap | Pair of cups |
For ProTas solo (1 Protas & 1 cup)
....................................................................................................................................................................................................................................................................................
| Rest of the box | |||||||
|
|
|
|
|
|
|
|
| x1 | x1 | x1 | x1 | x1 | x1 | x2 |
x1 |
| Base | Flex part | Magnetic support | 20mm screw | Nut | Pad | Scratch Strap | Pair of cups |
For ProTas base (without cup)
....................................................................................................................................................................................................................................................................................
| Rest of the box | ||||||
|
|
|
|
|
|
|
| x1 | x1 | x1 | x1 | x1 | x1 | x2 |
| Base | Flex part | Magnetic support | 20mm screw | Nut | Pad | Scratch Strap |
Mounting
________________________________________________________________________________________________________________________________________________
 |
 |
 |
||
| Assemble the ProTas and the MagCup using the magnets on each part. |
||||
________________________________________________________________________________________________________________________________________________
 |
 |
 |
||
 |
 |
|||
| Adjust the magnetic bracket to make it comfortable when you play (you can always re-adjust it later). |
||||
________________________________________________________________________________________________________________________________________________

Tighten the screw with the provided Allen key.
________________________________________________________________________________________________________________________________________________

Release the straps and set them apart from each side, and remove the plastic protection from the pad.
________________________________________________________________________________________________________________________________________________

Attach the ProTas to your armchair with the pad and the straps (for more stability), or on your desk with the sticky pad.
________________________________________________________________________________________________________________________________________________

Insert your controller into the magnetic cup and play.
Tips
....................................................................................................................................................................................................................................................................................
- You can play games feeling like in a cockpit and take off the cup with the controller at any time if you need to. A simple wrist rotation suffice to detach the magnetic cup.
- You can clean up the sticky pad with water if it is dusty. That way, once well dried, it will be good as new and sticky again.
- The ProTas can be used on any support that you like (desk, coffee table, chair with arms, etc.).